| PFClean Documentation | File Out |
Parameters
The File Name: and File Path: fields define the names and location the clips will be exported to. In its simplest form, the location is a directory and each clip's filename will be applied to this to give the full export path. The list on the right-hand side shows the full path and filename that will be used for each clip. A tooltip will appear when hovering the mouse over an item in the list to show the full path being used.
More complex paths can be specified by the use of substitution variables:
%c- Clip filename%n- Clip name%e- File type extension%d- Original source material directory%u- Unique export number (auto-increments on each export)%i- Clip in point%o- Clip out point
So a path like %d and a name new_%c.%e will export a clip to the same directory as the source material but prefix the filename with "new_". The path and name %d/%c.%e will overwrite the original clip material although this workflow is not recommended!.
The %d substitution variable can optionally be followed by an argument that specifies which part of the original source material's directory you want. This is best illustrated with some examples:
  %d= /server/path/to/clip/5  (no arguments is the whole directory)
  %d[1]= server               (the 1st directory)
  %d[2]= path                 (the 2nd directory)
  %d[1,3]= server/path/to     (the 1st through to 3rd directories)
  %d[-1]= 5                   (the last directory, a negative numbers counts from the end not beginning)
  %d[2,]= path/to/clip/5      (a blank 2nd number means "until the end")
Substitution variables can be inserted at the current cursor position of File Name: or File Path: fields by clicking the corresponding buttons.
For image sequence export the filename's frame number padding upon export will, by default, be the same as the source material. If you wish to change this then you can specify the amount of padding by using "#" in the name. For example, a name of %c####.%e will use 4 digits for the frame number (provided that is sufficient). When a remaster is exported the default amount of frame padding is specified by the value in the Export section of the Preferences.
Render
The Render section in the export parameters allows selection of additional effects which can be applied to clips.
Safe Grids. Click the  button to enable and select a safe grid preset from the menu. New presets can be made in the Cinema window by clicking the Safe Grid parameters button
  in the Cinema additional controls.
Overlays. Click the  button to enable and select an overlay preset from the menu. New presets can be made in the Cinema window by clicking the Overlay parameters button in the Cinema additional controls.
Colour space. This option can be used to select an OpenColorIO colour space for the export. Once selected, any clip that has a colour space assigned to in the Media Admin panel will be converted into this colour space during export. Please note that no colour transform will be applied to any clips that have not been assigned a colour space (or are using the "Raw" colour space). Clicking the  button will display a colour cube popup window illustrating the transformation into the target colour space.
Sparse frames. Click the  button to toggle between exporting all frames or only those frames that have been modified by any restoration operations.
Note though that certain operations such as an upstream format conversion, applying safe grids or overlays, will mean that all frames will have to be exported regardless of the Sparse option choice.
File Format
The File Format section allows the selection of the file format and other parameters used when exporting the clips.
When exporting image-based file formats such as DPX or EXR, RGB or RGBA components can be chosen to export just the RGB channels or the alpha channel as well (provided the export file format supports an alpha channel). The bit-depth can also be selected, and if the bit-depth is increased from the source media the Dequantize check-box can be enabled to reduce quantization effects which can be visible when low bit-depth colours are scaled up to higher bit depths.
If the Quicktime format is selected for export, a codec can also be selected. For JPEG codecs, the JPEG quality can be chosen as well.
If Media Foundation formats are selected for export, a bit-rate (measured in Mbps) can be specified for encoding.
Clip List
The clip list shows the names of all clips in the File Out node, as well as their in and out points, duration and the location and file name for the export. The in and out points for each clip can be edited by double clicking the In or Out columns for that clip. If the full export path is not visible, it can be displayed by hovering the mouse over the Filename column.
The Individual Clips checkbox indicates that clips that are part of a Remaster timeline should be listed and exported as individual clips, rather than treating the Remaster timeline as a single clip.
The Glue Sequence checkbox can be used to quickly glue a cut sequence back into a single clip for export. This can only be done for two or more clips cut from a single sequence.
The Display button  will display the selected clip in the Cinema. Click the button again to return to the Workflow Manager.
The Preview Slice button  will open a poupup window where a small section of the selected clip can be chosen for export. Preview slices for each clip are displayed in white in the Clip List with a preview icon.
The View Export button  can be after a clip or preview slice has been exported to load the clip back into the Cinema window for viewing. Viewing clips in this way will automatically assign any OpenColorIO colour space that was chosen during export.
Preview Slices
Exporting a preview slice can be useful to quickly check exactly what the final export of the entire clip will look like.
To generate a preview slice, click the Preview Slice button to view the clip in the Cinema and open a popup window:
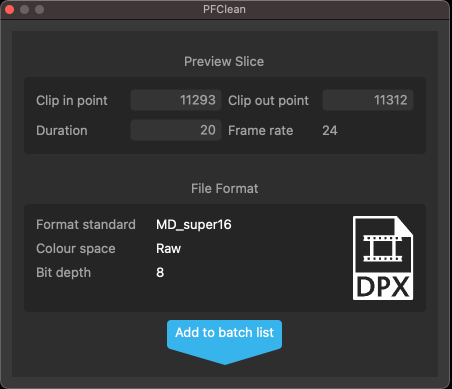
The in and out points of the slice can be chosen, along with the slice duration. The default duration is 20 frames, but this can be adjusted in the export preferences window. The frames that are to be exported will be displayed in yellow in the scrub bar:

To quickly select a range of frames to export, click and drag in the scrub bar to change the clip in point.
Clicking the Add to batch list button will create the preview slice ready for export. Preview slices for each clip are displayed in the Clip List with a preview icon:

To remove a preview slice, right-click on the item in the clip list and select Delete from the popup menu.
Export Controls
The triangular button on the right of the hour-glass control can be used to control which clips or preview slices you wish to export:
 : Export ALL clips.
 : Export only SELECTED clips.
When only exporting selected clips, those clips can be selected by checking the Selected column in the clip list.
If preview slices have been added to the batch list, additional options are also available:
 : Export ALL clips and ALL preview slices.
 : Export ALL clips and NO preview slices.
 : Export ALL preview slices and NO clips.